Here is the complete, expanded blog post, now featuring the new section on how tree collards double as a year-round superfood for your backyard flock.
Growing Tree Collards: Your Coastal One-Acre Farm’s Year-Round Superfood
Imagine a single plant that feeds your family every week of the year, thrives in coastal fog, and lives for up to two decades. Meet the tree collard (Brassica oleracea var. acephala). For a beginner harvester on a one-acre coastal homestead, this perennial powerhouse is the ultimate, stress-free shortcut to food security.
Unlike traditional garden vegetables that require constant replanting from tiny seeds, tree collards are incredibly tough, easy to start, and provide an uninterrupted harvest through winter frost and summer heat alike.
Why Tree Collards Rule the Coast
Coastal weather offers distinct advantages, but it also brings challenges like heavy wind, foggy summers, and sandy or acidic soils. Tree collards are uniquely suited to handle these conditions, making them perfect for beginners.
- Grow Once, Harvest for Years: They grow as a woody shrub, living 10 to 20 years without needing replacement.
- Cool-Climate Lovers: They thrive in mild, foggy coastal weather where traditional heat-loving crops struggle.
- Sweetened by Frost: While they grow year-round, winter cold triggers starch conversion, making the leaves incredibly sweet in January.
- Space Efficiency: Because they grow vertically up to 8–10 feet, they leave plenty of your acre open for livestock or other crops.
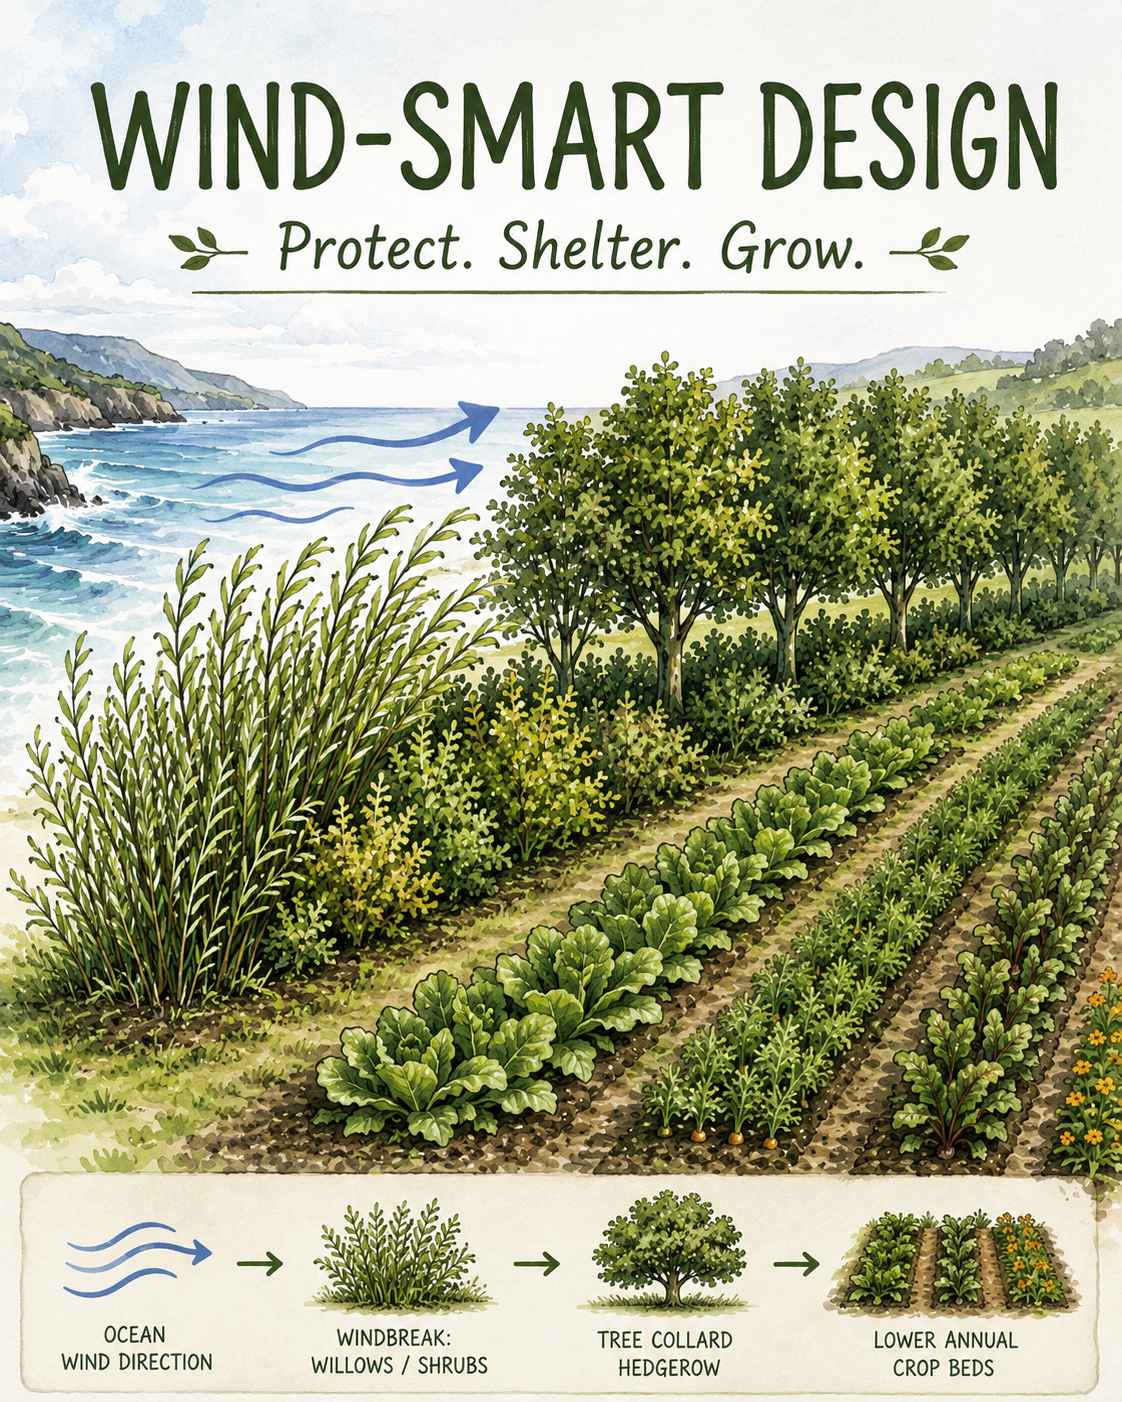
Designing Your One-Acre Year-Round Plot
Maximizing a one-acre coastal property requires strategic placement to protect your crops and ensure high yields.
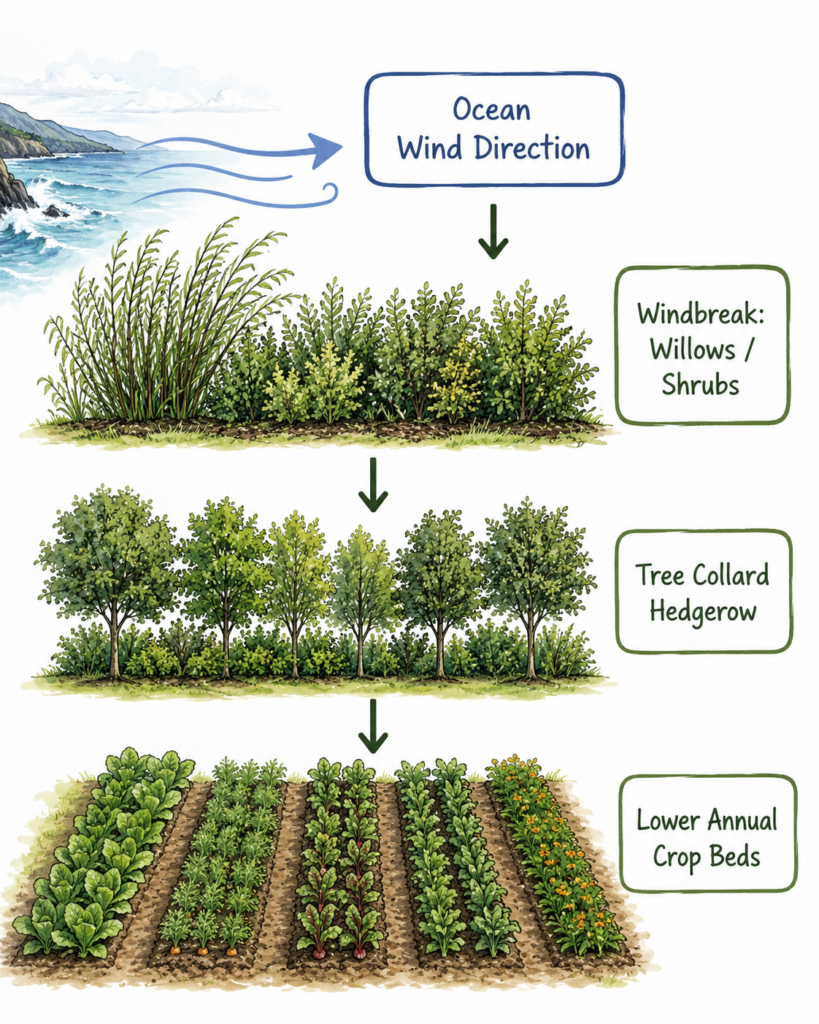
1. Build a Living Windbreak
Salt-laden winds can shred large leaves. Plant your tree collards behind a sturdy coastal windbreak, such as wax myrtle, ocean spray, or willow hedges.
2. Plant in Hedgerows
Incorporate tree collards into a perennial food forest zone. Space individual plants 3 feet apart in rows. Their dense, purple-green canopy will create a microclimate that shields smaller, delicate winter greens underneath.
3. Soil Preparation
Coastal soils are often sandy or heavily acidic. Dig in plenty of well-rotted manure, compost, and a dusting of agricultural lime to raise the pH closer to 6.5. Tree collards are heavy feeders that love nitrogen.
Beginner-Friendly Propagation and Maintenance
You rarely grow tree collards from seed; they are almost exclusively grown from cuttings. This makes expanding your crop across your acre highly cost-effective and legally foolproof for beginners.
- Take Cuttings: Cut a 6-to-9-inch woody stem with at least 3 to 4 growth nodes.
- Rooting: Strip the lower leaves and push the stem directly into moist coastal soil or a potting mix. They root easily in spring or autumn.
- Staking: Because they grow tall and top-heavy, drive a sturdy T-post or wooden stake next to each plant to prevent coastal gusts from blowing them over.
- Pruning: Pinch the growing tips regularly. This encourages a bushy shape with more accessible leaves rather than one tall, spindly stalk.
How to Harvest (The “Cut-and-Come-Again” Method)
For beginners, harvesting tree collards is as simple as it gets. You never pull up the whole plant. Instead, you use a sustainable method that keeps the plant producing indefinitely.
- Bottom to Top: Always snap off the lower, mature leaves first. Leave the top crown of smaller leaves to continue growing upward.
- The “Snap” Technique: Hold the leaf stem close to the main stalk and push downward. It should snap off cleanly without ripping the bark.
- Harvest Schedule: Take a few leaves from each plant every week. Rotating through your grove ensures you never over-harvest a single shrub.
Bonus: Year-Round Superfood for Backyard Chickens
If you keep a backyard flock on your one-acre farm, tree collards are a massive money-saver. Buying commercial organic feed gets expensive, and winter often cuts off your birds’ access to fresh, healthy pasture.
Tree collards bridge that gap perfectly, serving as a highly nutritious, zero-cost dietary supplement for your chickens 365 days a year.
- The Golden Egg Secret: The leaves are packed with beta-carotene, iron, and calcium. Feeding them to your flock results in deep, rich, vibrant orange egg yolks.
- Winter Greens: When winter frost kills off normal grass and weeds, tree collards keep producing. They provide vital live vitamins to your chickens during the bleakest months.
- The “Pinata” Method: Hang a bundle of whole collard leaves from the top of the chicken run using a piece of twine. This keeps the food clean, off the ground, and provides excellent entertainment to prevent winter boredom and pecking.
- The Homestead Loop: Chickens eat the leaves and produce nitrogen-rich manure. You compost that manure and feed it right back to your nitrogen-loving tree collards, creating a perfect, self-sustaining loop on your acre.
From Garden to Table: The First-Harvest Sauté
Because tree collards are naturally sweeter and more tender than standard store-bought kale, they do not require hours of boiling. This quick, beginner-friendly skillet recipe lets the fresh flavor shine.
Ingredients:
- 10–12 freshly harvested tree collard leaves
- 1 tablespoon olive oil (or butter)
- 2 cloves garlic, sliced thin
- A pinch of sea salt and black pepper
- Optional: A splash of apple cider vinegar or lemon juice
Simple Steps:
- Prep the Leaves: Rinse the leaves in cold water. Hold the bottom of the tough central woody stem and pull your hand upward to strip the soft green leaf away. Discard the tough stems (or toss them to the chickens!).
- Chop: Stack the stripped leaves, roll them tightly like a cigar, and slice across into thin, ribbon-like strips.
- Sauté the Garlic: Heat your oil or butter in a skillet over medium heat. Add the garlic and cook for about 1 minute until it smells fragrant (don’t let it brown!).
- Cook the Greens: Toss the collard ribbons into the pan. Stir continuously for 3 to 5 minutes until they turn a vibrant, bright green and collapse into a tender wilt.
- Finish: Remove from heat, season with salt and pepper, and add a tiny splash of vinegar or lemon juice to make the coastal flavors pop. Serve warm!

Leave a Reply